Table of Contents
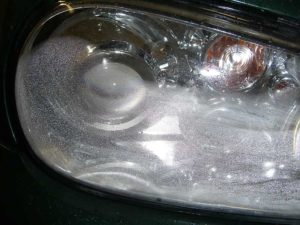
For quite some time now car manufacturers have made headlight lenses out of plastic.
This has cost benefits and allows for more creativity compared to glass since it can be produced thinner and still be durable. It will also be more impact resistant. All good things.
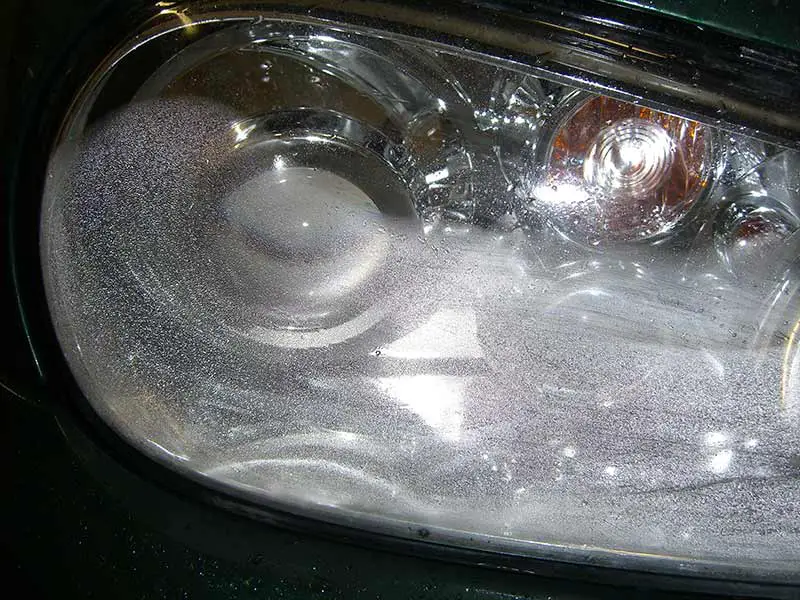
The downside is that plastic doesn’t react well to ultra violet light coming from the sun. UV rays break down the surface of plastics and cause oxidation. The visual effect of this is a chalky white hazy layer on the surface of the headlight lens.
There are plenty of DIY kits and home-brew solutions you’ve probably heard about. But what is the professional way to restore headlights?
Continue reading to find out.
One note before you continue though…
While I’ll be sharing with you what the “professional” method of headlight restoration is, I don’t recommend it. It will definitely get you good results but there is a better way to restore your headlights than the old school professional method due to the advent of durable ceramic coatings for plastics.
The professional method requires power tools and a lot more effort than using a high quality restoration kit. The old school professional method is being replaced with lower effort kits that rely on chemicals to do the majority of the work for you.
Professional headlight restoration steps
Step 1: Wash your headlights
Thoroughly wash your headlights with regular car wash shampoo using a microfiber wash mitt to remove as much dirt, bugs, and road grime as possible.
Step 2: Apply masking tape around the headlight lens
Protect adjacent surfaces with masking tape to prevent sandpaper from scratching and damaging paint and trim.
Step 3: Wet sand with 1000 grit sandpaper in vertical direction
Sand the surface of the headlight lens thoroughly and be sure to thoroughly sand hard to reach areas as well. Keep the surface very wet to prevent buildup in the sandpaper grit. I recommend getting a spray bottle to keep the surface consistently dripping wet. You’ll see the oxidation and dirt running off heavily during this step. Sand until you feel you’re satisfied that this grit sandpaper has run its course.
Step 4: Wet sand with 3000 grit sandpaper in a horizontal direction
This step is essentially identical to the previous step, just with a finer grit sandpaper. You may still see some dirt and oxidation run off during this process but it will likely depend on how aggressive you were when using the 1000 grit sandpaper. Keep working until you feel you’re not making any more real progress with this grit level.
Step 5: Use a Dual Action Polisher and a finishing polish
Polish the surface to a factory smooth finish. Chemical Guys makes a great polish that is specifically designed for restoring headlights and I highly recommend it. You can also use a standard finishing polish that would typically be used on your clear coat as a final polish.
Step 6: Protect the finished surface
Professionals typically apply a clear coat to the headlight lenses to preserve the finish and protect from UV rays. Short of mixing your own automotive-grade clear coat, USC SprayMax 2K Glamour High Gloss Aerosol Clear is a good option. Do your research well on this step though. Peeling and cracking can be a problem after some time if not applied correctly.
If you want to go with an easier solution you can use a quality paint sealant like Wolfgang Deep Gloss Paint Sealant. It won’t peel or crack but it will need to be reapplied to properly protect from harmful sun oxidation. You’ll want to test it on a spot to ensure that once it dries it is clear. You can even use car wax but you’ll have to reapply it at least monthly. Wolfgang Deep Gloss Paint Sealant will last up to 2 years without needing to be reapplied.
Best Headlight Restoration Kit On The Market
Cerakote Ceramic Headlight Restoration Kit
NIC Industries Inc. is a company that is all about extremely durable coatings. NIC owns the Cerakote brand which includes Cerakote Home & Auto. They also own Prismatic Powders.
Prismatic Powders produces powder coatings in the widest array of colors of any manufacturer – over 6500 colors. Powder coatings are extremely durable coatings typically used when you need high durability.
Cerakote produces specializes in thin-film ceramic polymer protective coatings. These coatings are extremely durable and used on firearms as well as other high-heat applications.
Cerakote Home & Auto is the newest division of NIC and as the name implies, specializes in ceramic polymer coatings for consumer needs. One of their first two products from this new division is the Cerakote Headlight Ceramic Headlight Restoration Kit.
I say all this to drive home the point that NIC knows quite a bit about industrial strength coatings that can withstand extreme abuse. This is the key point that separates the Cerakote Headlight Kit from the rest of the crowd.
The real benefit you get from restoring your headlights with the Cerakote kit is you’ll never have to restore your headlights again. The final step in the headlight restoration process with this kit is applying a protective coating. This coating comes with a lifetime warranty.
The other steps involved with restoring the headlights are similar to most other restoration processes. Remove oxidation with a chemical stripper and then wet sand with 2 different levels of sandpaper grit to finish the polishing.
What’s nice is that no power tools are required so if you don’t have a good dual action polisher such as a Porter Cable 7424XP. Just some simple wet sanding. The protective ceramic coating will finish the job and keep your headlight lenses flawless practically indefinitely.
Crazy ways the Internet says you can restore your headlights
I just had to share some of the whacky methods people try to either save a buck. The only other reason I can come up with is that someone wants to fix their headlights right NOW and can’t wait for something to ship and can’t be bothered to drive to the store. Don’t try this at home kids.
Can you really use toothpaste to remove oxidation from headlights?
Um, yeah, you can, but why would you want to? If you’re trying to save a few dollars this methods will work but it’s not going to work very well. It will improve the problem temporarily but won’t offer a permanent fix.
The toothpaste fix is going to be a lot more work than using proper restoration kit or professional method. If you have the right kind of toothpaste it is a very mild abrasive so it will work similar to polish. Not all toothpastes will be of the proper abrasiveness for this to actually work at all.
Additionally polishing is only one step in the professional process and by not using the appropriate abrasive level to get the job done it’ll take you a very long time or it’ll not leave your headlights smooth enough.
Can you really use OFF Insect Repellent to remove oxidation from headlights?
This trick will work a little but it won’t work as well as toothpaste. It’s also a really bad idea not just because it’s temporary but because it will probably damage the clear coat on your paint as well as damage plastic and rubber that it comes into contact with.
OFF Insect Repellent actually reacts chemically with the plastic of your headlights and causes the plastic to soften. The oxidation and softened plastic will come off as you wipe but most of the positive results come from the oils in the spray filling the pores of the plastic caused by the oxidation.
Once it rains or you wash your car most of the effects of using OFF will get washed away. Unfortunately this is also when the OFF can run off your headlights and onto nearby plastics and rubber causing damage.
I highly recommend avoiding this method. It’s very much a temporary solution and will likely cause damage to unintended surfaces.
Can you really use WD40 to remove oxidation from headlights?
WD40 isn’t going to remove anything. It will make your headlights look clear for a few days until the oils from the WD40 run off from rain or a car wash.
I’m not sure what unintended effects WD40 will have on your clear coat, rubber seals, or plastics so I again don’t recommend this home-brew solution.
Helpful Links
Conclusion
So we covered that wrong ways and the professional way to restore your headlights. But the best way to restore your headlights and get better results than the traditional professional method is to go with the Cerakote Kit. It’s inexpensive and easy. Plus it’s guaranteed for the the lifetime of your headlights.
Pro detailers are switching away from the manual method of wet sanding, polishing, and clear coating. When you run your own business you need to ensure your methods produce high quality results, but you also need to limit your expenses and hours as much as possible to increase your margins. Be smart and go with a quality solution that gets results with less effort.
Good luck and happy detailing!