Table of Contents
- How To Make A Car Shine Like Glass:
- Step 1: Properly Wash Your Car
- Clay Bar & Lube
- Dual Action Polisher
- Ceramic Coating
- Clay Bar & Lube
- Dual Action Polisher
- Ceramic Coating
- Step 2: Carefully Dry Your Finish With Safe Methods
- Step 3: Perform A Paint Decontamination
- Step 4: Perform Paint Correction On Problem Areas
- Step 5: Protect The Finish With A Quality Coating
- Helpful Links
- Conclusion
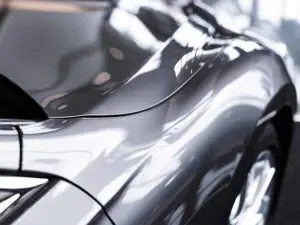
Making a car truly shine and look a mile deep when you gaze into the finish is a combination of steps done properly. If you want to learn how to make a car shine like glass, you will need to learn to properly wash, dry, decontaminate, perform paint correction, and protectively coat your car or truck. It takes a bit of work to make your car shine like new, but for some of us, it is worth the effort.
The deciding factor in making your car shine is the protective finish applied at the end. In order to get to that perfect shine at the end, you will need to learn the proper way to wash your car and protect it.
This article will focus on the basics necessary to get that show car quality shine on your vehicle. We will not be covering inspecting and paint correction since that is much more advanced.
How To Make A Car Shine Like Glass:
We want to focus on the most important and easiest to perform steps to get you as quickly as possible to the point that your car will almost glow it’s so shiny.
Again, while the protection step is the step that really gives your car that shine, not paying attention to properly cleaning the surface of your paint first will limit your results.
You may be inclined to skip the clay step, feeling that it may be overkill but you would be mistaken. If you’ve never “clayed” a car before you’ll likely be surprised at the amount of buildup that gets ingrained into the clear coat of your car. A clay bar is a simple process. Once you see your car shine after, you will be glad you took the time.
Step 1: Properly Wash Your Car
Obviously, if you want to learn how to make your car shine like glass, you need to begin by giving the car a proper bath. You must pay close attention to detail while you wash your car to avoid problems that will have to be resolved later.
It’s very easy to create scratches and swirls in your clear coat if you’re not careful so we need to ensure that we get the road grime off the car and off of your wash mitt so that it doesn’t get scrubbed around on your paint surface causing scratches.
We also want to ensure that we don’t leave water spots that we need to clean off. To achieve these 2 goals we’ll want to use a method for washing a car called the 2 bucket method.
One bucket is reserved for soap and the other is reserved for rinsing your wash mitt. In the bottom of each bucket, you’ll want to place a grit guard which is designed to prevent you from pulling grit back up and onto your wash mitt.
Last, to ensure that we don’t leave water spots on your car’s paint, you’ll want to use a ph-neutral automotive shampoo. Ph neutral shampoos are gentle on your car’s paint and leave no spots but are tough enough to remove dirt and debris.
What you’ll need to wash your vehicle:
Car Wash Instructions For the Perfect Shine
Place grit guards in the bottom of each bucket. These silicone grit guards are specially designed to trap dirt and debris in your rinse bucket, keeping them out of your wash mitt and off of your car.
Add the pH-neutral shampoo to one bucket and fill it with water, foaming up the shampoo well in the process. Fill the other with just water.
Rinse your car thoroughly. The goal is to get as much road grime off as possible before needing to physically touch the car. That way, you reduce the risk of causing surface scratches or swirl marks while you scrub your car.
Saturate your wash mitt well and soap it up. Gently wash and rinse your car or truck as you go. Start at the top and work your way down. Frequently rinse your mitt in the water-only bucket and soap it back up in the shampoo bucket.
Try to get all of the grit out of your mitt before placing it back on your car or truck or you run the risk of creating swirls and scratches in the clear coat.
When you’re done, inspect the car thoroughly to ensure you’ve covered it well and rinse it one last time.
Clay Bar & Lube
Chemical Guys Clay Kit
Dual Action Polisher
Chemical Guys TORQ
Ceramic Coating
CQuartz UK 3.0
Clay Bar & Lube
Dual Action Polisher
Ceramic Coating
Chemical Guys Clay Kit
Chemical Guys TORQ
CQuartz UK 3.0
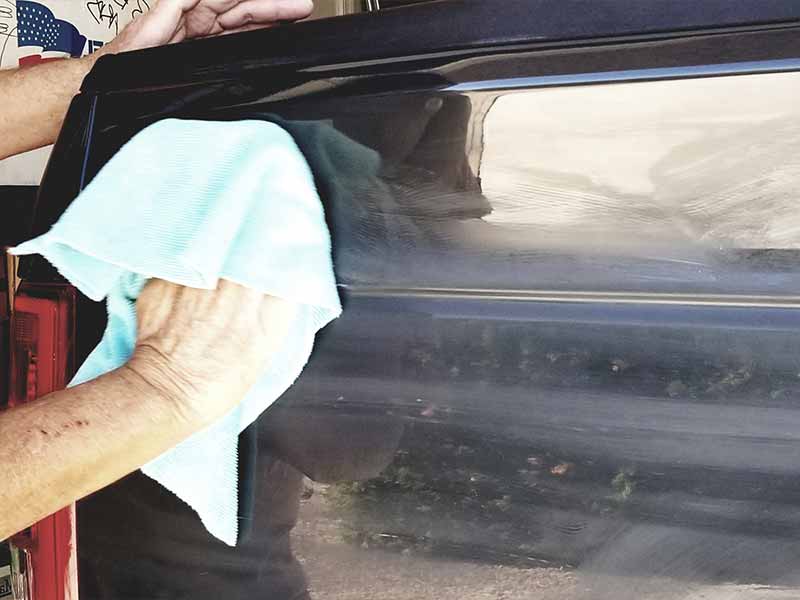
Step 2: Carefully Dry Your Finish With Safe Methods
In an effort to minimize touching the surface of your vehicle and preventing opportunities to create scratches and swirls, you can blow dry your car with a leaf blower or a dedicated car air dryer.
It’s also common for people to simply use a large microfiber towel to wipe down the car thoroughly.
Microfiber towels are excellent at absorbing water and are very delicate on the surface of your car or truck.
What you’ll need to dry your vehicle:
Why Should You Dry Your Car After a Car Wash?
You might think letting your car air dry is good enough. Remember that water droplets will dry on your car and leave behind a stain that mars the surface of your perfect shine.
Just like how water stains will ruin the look of glass, letting your car air dry after washing will interrupt that shine and leave streaks or spots. This is even more apparent if you have a black car.
In addition, if you don’t dry your car thoroughly with a microfiber cloth you risk leaving soap or foam on the car by mistake. Hopefully, all of that was rinsed off when you spray your car, but if you missed a spot, drying your car by hand is a last line of defense.
Step 3: Perform A Paint Decontamination
There are two main parts to decontamination – Iron Remover and Clay Bar. Once again, you may be tempted to skip this step. While your car paint may look clean and free of swirl marks, fine particles of dirt and metals from the road may still be ground into your paint.
To keep your paintwork pristine and your car looking polished, take the time to add an iron remover and a clay bar to your polishing job.
What is the Best Way to Remove Iron?
An iron remover is a product that is sprayed on the car’s finish and rinsed off with water after it has been allowed to sit and react for some time.
Iron remover does exactly what the name implies and removes iron deposits on your car’s paintwork. While driving, iron particulate in the air will collect on your car or truck over time and adhere strongly to the clear coat.
The best way to remove these metallic contaminants is with a dedicated iron remover. Rather than attempting to remove iron from the paintwork by washing, an iron removal product will chemically react and break down the particles.
How Does Iron Particulate Get on my Car?
Iron particles come mostly from the brake pads of other cars in traffic. There are plenty of other sources such as trains and industrial facilities that can give off iron particles or other metallic contaminants. Where ever you drive, you run the risk of encountering them. Thankfully, it is a straightforward process to remove iron particles from your paintwork.
How to Use Iron Remover on my Car
Once the iron remover has been sprayed on the surface of your finish it will begin to react with the iron particles and break them down. Most iron removers will cause a chemical reaction with the iron and turn a purplish color. The color helps you see the debris clearly against your paintwork, ensuring it is all polished clean.
You obviously should follow the directions for your iron remover of choice. That said, most products work the same way. For this cleaning guide, we will follow the instructions of The Chemical Guys Decon Pro detailing products.
What you’ll need to remove iron from your vehicle:
Iron Removal Steps
- Spray the Decon Pro detailing spray on wheels and other road-facing surfaces
- Allow the Decon Pro to rest for five minutes. Do not allow the product to dry on the surface of your wheels or paintwork. Iron particles should turn a dark purple-ish color.
- Use a microfiber polish cloth or wash mitt to gently agitate the area.
- Rinse thoroughly, ensuring all the Decon Pro is removed.
These are the instructions for The Chemical Guys Decon Pro, but most products will suggest spraying, wiping around to work the iron remover in, and allowing to sit for 5 minutes or so. You don’t want to allow the iron remover to dry on the car so work in the shade and rinse off if you see any signs of drying.
Clay Bar
Claying is the process of using a literal piece of clay and rubbing it across the surface of your paint.
The clay will pull out all sorts of road grime that has adhered so firmly to your vehicle’s clear coat that simply washing won’t remove it.
For the clay to glide across your paint you need to use a dedicated lubricant.
There are a few products that are recommended for use as a clay lubricant but you won’t want to get creative here or you can potentially create a real problem.
Once you’ve thoroughly clayed the entire surface of your paint you’ll want to give it one more quick wash and dry. Be sure and follow the same process as above.
What you’ll need to clay your vehicle:
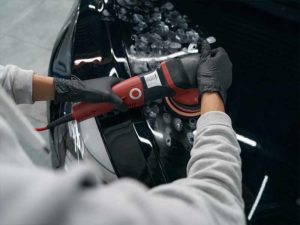
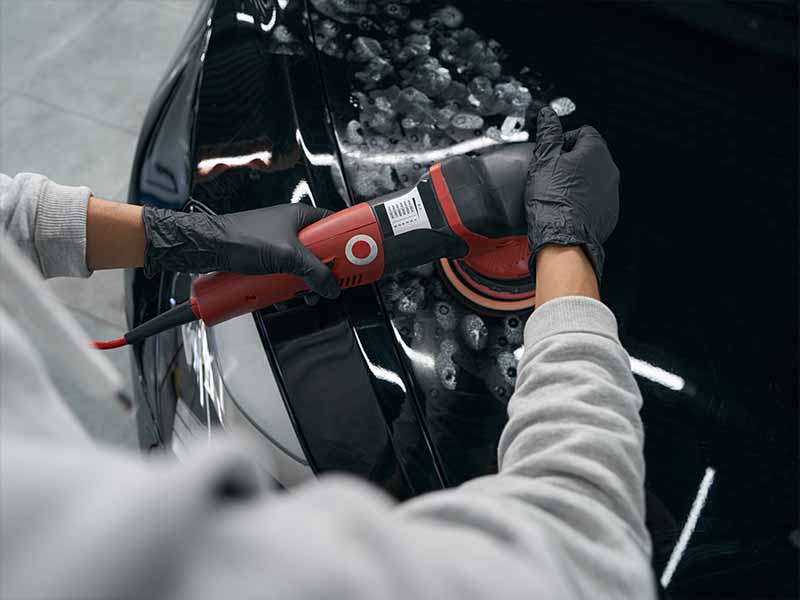
Step 4: Perform Paint Correction On Problem Areas
Paint correction is mostly the process of removing fine swirls and scratches from the clear coat of your vehicle’s paintwork.
Over time very light surface scratches appear on your finish and will cause it to look dull and old. If you want to restore that new car shine to an older vehicle this is probably the most crucial step.
I was driving home from work not too long ago and past an older black Lexus that looked like it had just left the detailer after a proper paint correction. It was a true head-turner because you don’t expect to see such a pristine finish on a 15 or so-year-old car, particularly a black car. The paint looked perfect and the shine was amazing.
Once you’ve followed all of the previous steps in this post, you’re ready to polish out those scratches on your paint and sport a perfect shine on your own car.
To polish your paintwork, you’ll want a dual-action polishing kit. For this guide, we will be using The Chemical Guys Random Orbital Polishing Kit.
First, apply a small bit of polishing compound to your dual action polisher. Next, gently guide it over the panels of the car with a light amount of pressure. You want the polishing compound to do the work. When you’re done you should be free of all of those light spider-web like scratches.
Many new DIY detailers are apprehensive about trying to remove swirls and scratches themselves. In the past, it was much easier to damage the finish with a polisher. Many car owners preferred to car polish by hand and leave the gadgets to the pros.
Thankfully, today’s dual-action polishers are very gentle. If too much pressure is put on the polisher it will stop spinning to prevent damage from occurring so you can shine without fear.
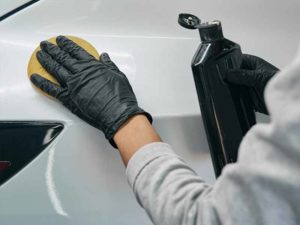
Step 5: Protect The Finish With A Quality Coating
There are 3 main types of products used by car owners to protect the finish on their cars:
- Wax
- Sealant
Ceramic Coating
Wax
Waxing provides the best shine but the shortest protection. Typically Carnauba wax lasts only a couple of months.
Carnauba wax used to be all there was to apply to your finish for protection. Fortunately, that’s no longer the case. As great as a quality carnauba wax may look, it doesn’t last long enough to justify the effort required to apply it. The only exception to this is show cars. If you’re displaying your car at an event and competing against others, every little bit of added luster and glow could be the difference between first and second place.
Sealant
High-gloss paint sealants have gotten very good and coming close to the shine of carnauba wax. They provide as much as 2 years of protection. Wolfgang Deep Gloss Paint Sealant is my high-gloss paint sealant of choice and it holds up well for close to 2 years.
Paint sealants are easier to apply than ceramic coatings and given the longevity of a coating like that from Wolfgang, it’s a great choice to go with.
In addition to the longevity, the shine it produces is stellar.
Ceramic Coating
Ceramic coatings also can provide good shine but they offer another benefit as well. Ceramic coats improve upon durability by as much as 5 years or more for the consumer-grade ceramic coatings you can buy as a non-professional.
If you’ve decontaminated your finish as described above your clear coat is in a perfect state to consider applying a ceramic coating. All you have to do is an IPA wipe prior to applying a ceramic coating.
An IPA wipe is simply a diluted isopropyl alcohol spray and wipe. An IPA wipe can be performed with a spray and your own microfiber detailing cloth, or with a ready-made IPA car wipe.
Simply wipe down the car’s finish to remove any residual oils and waxes that may be left on the finish before applying a ceramic coating.
Of the DIY ceramic coatings on the market, I’m a big fan of both CQuartz UK 3.0 and Adam’s UV
Ceramic Coating
. CQuartz shines and beads slightly better of the two. It also has a lifespan of 2 years or more typically. Adam’s comes close to the gloss and beading of CQuartz but lasts an astounding 5 years or more.What you’ll need to protect your vehicle:
Helpful Links
Conclusion
The key to getting that show car glass-like shine is not just the protectant you apply to the paint, but the prep work that comes prior to doing so. To keep your paintwork ready for a photo finish, follow these simple car polish tips.
If your clear coat is in particularly rough shape you may want to spend some time on paint correction. This step isn’t necessarily for the average beginner to detailing but it’s easier than you think. You can find a good detailer local to you that could get the job done as well.
It won’t be cheap and honestly, if they’re going to be doing paint correction you might as well have them apply a good paint protection sealant like a ceramic coating while they’re at it.
Properly wash, dry, decontaminate, paint correct, and protect your car or truck and you’ll end up with a stunning finish. The products you choose for protecting your vehicle are often looked at as what makes the shine but it’s the entire process that gets the results.